How to Customize Your Transactional Emails
This guide shows you the steps to configure and personalize the emails your customers receive during the shipping process.
1. Initial Configuration
Before creating templates, you need to set the sender correctly.
- Configure the Mail Server (SMTP): Proper SMTP setup is essential for sending emails. This configuration, including SPF and DKIM records to ensure maximum deliverability, is a crucial technical step. For detailed instructions, please refer to our SMTP Email Server Guide.
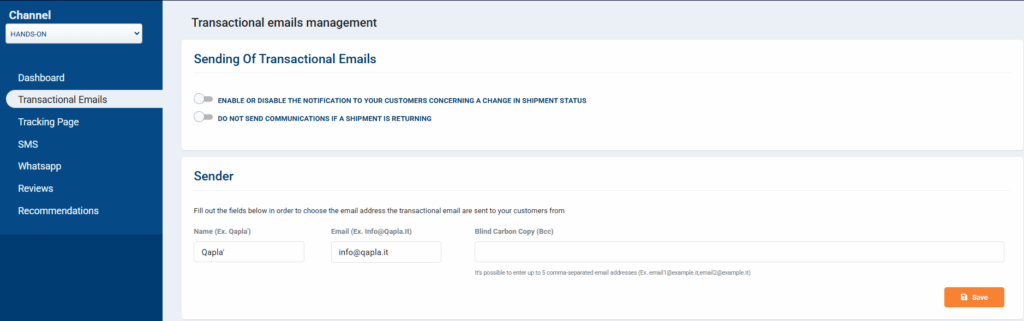
- Customize the Sender:
- Go to Marketing > Transactional Emails.
- In the “Sender” section, set the display name customers will see (e.g., “Your Shop”) and your email address.
- You can add up to 5 BCC addresses, useful for your logistics or support team.
2. Creating & Managing Templates with Q’editor
Once the server is configured, you can start creating your templates.
- Choose Status, Language, and Model:
- In Transactional Email Management, you’ll see the 9 standard shipment statuses (e.g., Partito, In Consegna, Consegnato).
- Click “Settings” on the status you want to configure.
- Choose the language for which to create the template. If you sell internationally, it’s good practice to create at least one template in Italian and one in English.
- You can also differentiate templates by “Model”, i.e., the sales channel the order comes from (e.g., Prestashop, eBay). If you prefer a single setup, choose “All”.
- Start from the Right Template:
- Click “Create new” to open a gallery with 50+ starter templates.
- You can start from a Blank Template or pick a ready-made one to customize.
- Set Layout and Subject:
- In the “Settings” tab, define general options such as body width (recommended: 500px), background color, and default font.
- At the top left, assign an internal name to the template and, most importantly, set the Email Subject. You can use metavariables such as: “Your order [REFERENCE] from [SITE_NAME] has been shipped” to make it dynamic.
3. Content Personalization
Use the “Content” tab on the right to drag elements into the email body.
- Modules: The editor is based on sections called Modules. You can drag predefined modules or multi-column layouts and save them as custom to reuse across templates.
- Text & Metavariables
See the guide: Qapla’ Metavariables.- Add elements like Title or Paragraph from the Content tab.
- Use Dynamic Fields (metavariables) to personalize messages (e.g., Dear [NAME]).
For the status icon, use [STATUS_ICON]; for the status name, use [STATUS_NAME]. - Dynamic Content: Show text only when certain conditions occur, e.g., for Cash on Delivery (POD) orders or based on a specific carrier (COURIER COURIER_CODE).
- Visual Elements:
- Images: Drag the Image element. Upload your own images or search a free stock library. Add links to each image to drive to landing pages, promos, or your blog.
- Video: Drag the Video element and paste a YouTube or Vimeo URL. The editor will fetch the preview automatically.
- Call-to-Action (CTA) & Tracking:
- Add a Button. For the “Track your shipment” button, put the [TRACKING_URL] metavariable in the link field.
- Always use UTM parameters on promotional links to measure campaign performance in Google Analytics.
- Order Information:
- Product List: Drag the Product List widget to display the order items. Use Configure to choose which details to show (SKU, quantity, price, etc.).
- Barcode & QR Code: Use the Barcode widget to generate EAN13/EAN8 barcodes or QR codes, useful for in-store pickup.
- External Integrations:
- Custom HTML: Paste HTML code to add advanced elements like countdowns or third-party scripts (e.g., product recommendations).
- Ready-Made Widgets: Easily integrate external tools like Trustpilot for requesting reviews or Bantoa for product recommendations.
4. Duplication & Activation
- Duplicate Templates: Speed up your work by duplicating an existing template for other statuses, languages, or models.
- Activate Individual Templates: In Transactional Email Management, tick the “Active” checkbox for each template you want to use.
Remember: only one template can be active for each status × language × model combination.

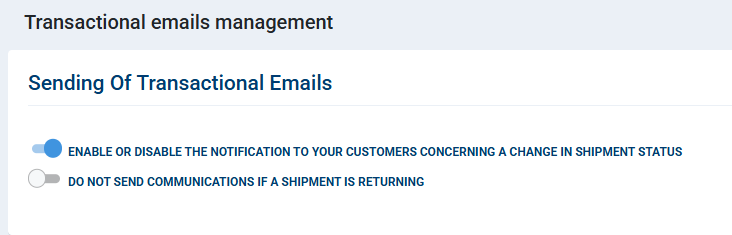
- Final Activation: As a last step, go to the top of the page and toggle the global switch “Enable or disable the notification to your customers concerning a change in shipment status”.

Need help?If you need assistance, contact Qapla’s Customer Care at support@qapla.it