Introduction
With the Qapla’ PUDO Plugin, you can offer your customers and prospects the option to receive their orders at pick-up points. This way, you can propose an even more flexible shopping experience, save on shipping costs and minimize inventory hold-ups. Thanks to the introduction of pick-up points, your e-commerce will be able to compete with the big players in the market.
See here a DEMO
Technical Requirements and Compatibility
Compatibility with PrestaShop versions: 1.7.8, 8.0, 8.1, 9.0
Developed with: PHP 7.4, also compatible with PHP 7.3 and 7.2
Installation, Configuration, and Activation
Installation
To install the Qapla’ PUDO Plugin, just download it from the PrestaShop page, log into your e-commerce CMS, go to the Modules > Module Management section. By clicking on “Upload a Module,” you can easily add the previously downloaded plugin.
At this point, you will need to configure it.
Configuration
If you are not yet a Qapla’ customer, you can visit this page and proceed with registration. Then you will be contacted by a Qapla’ team member to finalize the registration, configure and activate the Qapla’ PUDO plugin.
If you already have a Qapla’ account, great, you can proceed on your own.
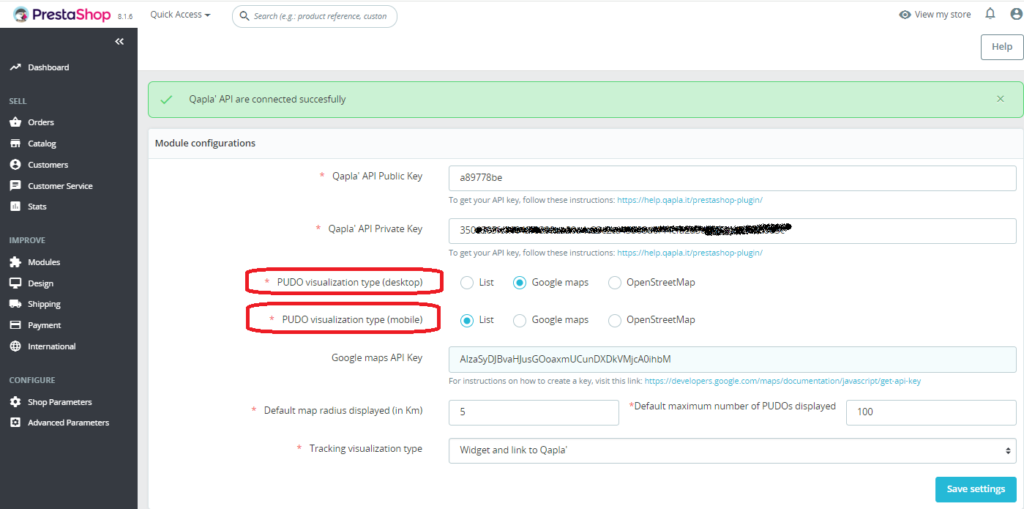
Please enter the following data:
- Qapla’ API Public Key
- Qapla’ API Private Key
You can find both pieces of information within the “Channel” section in the Qapla’ control panel.
Type of PUDO View: You can choose between the map view (Google Maps or Open Street Map) or the listed view. We suggest the map view with Google Maps for desktop and the listed view for mobile.
If you want to use the Google Maps map, you will need to enter its API Key. Here is the documentation.
You can then decide on the default search radius and the maximum number of PUDOs to be displayed in the results.
Finally, you can decide the type of view for the shipment tracking.
Once the settings are saved, the module on your site will be linked to your Qapla’ account.
Activation
If you are already a Qapla’ customer, after downloading the Qapla’ PUDO Plugin, you can activate it in just a few steps:
Simply contact the Success team via email at success@qapla.it, and they will get back to you to proceed with the activation together.
Start Using Pick-Up Points
Once the plugin is activated in the Qapla’ control panel, you will have the option, if you wish, to exclude certain carriers (among those already configured) from the pick-up points proposed in your e-commerce.
Simply go to the dedicated section within the Carriers area of your channel.
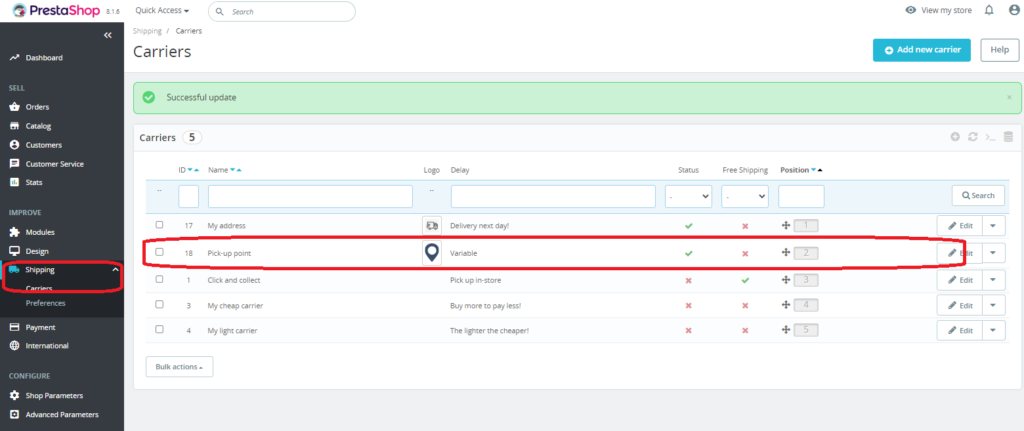
Once the activation is complete, a “Pick-Up Points” section will automatically appear in the Carriers area of your PrestaShop account. You can decide whether to activate all your carriers or limit the pick-up points to only some of them.
Remember that on PrestaShop you can customize the information that appears at checkout:
- Icon
- Name
- Timing
- Pricing
Simply go to the “Shipping” section and then “Carriers” and modify the default one created by the PrestaShop module.


