Connect your Connectif account to Qapla’ to synchronize the tracking status of your contacts’ orders and customize the Qapla’ tracking-page with Connectif Web Content.
1. Create a Connectif channel in Qapla’
1. Please log-in to your Qapla’ account.
2. Go to Settings > Channels and click on Create new channel.
3. Name it “Connectif” and, in Channel Data fill it out with the following information, as shown in the image:
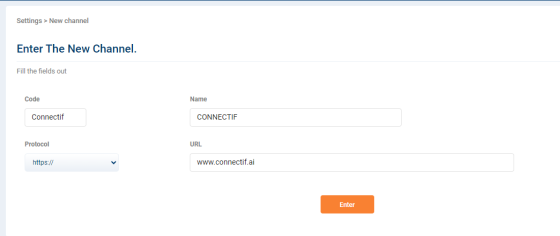
- On Address, enter “www.connectif.ai”.
- On Code, enter “Connectif”.
4. Click on Enter.
2. Enter the Connectif snippet in the tracking-page of Qapla’ to collect its activity
5. Go to your Connectif account and access to Shop settings from the left side menu.
6. In the tab selector, go to “Channels > Web” and copy the script from the section Client integration script.

7. Go back to Qapla’ and access the Marketing area of the Connectif channel created in step 1.
8. Go to the section “Tracking Page” and paste the script that you have just copied as a Script inside HEAD.

9. Click on Save.
3. Create the customized integration in Connectif
10. Go to your Connectif account and access the Shop settings from the left side menu.
11. In the tab selector, go to “Integrations > Customized integrations (webhook)” and click on Create New Integration.

12. Set up the field “Integration Name” in order to identify the integration.
13. (Optional) Customize the colour, include a description or categorize the integration.

14. Click on Update.
4. Create the Reception Event
Below you can find the steps to create and configure the event which will receive information about the transport status of the Qapla’ order.
15. On the tab Receive Data, please click on Create New Reception Event.
16. Assign it a name and the alias “order-status-change”. Click on Save.

17. Click on Add a New Field to create each one of the customized fields and complete their information:
- Create a field named “courierStatus” with the ID “courierStatus” of type Text.
- Create a field named “customerEmail” with the ID “customerEmail” of type Email and mark it as required and primary key.
- Create a field named “customerName” with the ID “customerName” of type Text and mark it as required.
- Create a field named “language” with the ID “language” of type Text.
- Create a field named “qaplaStatus” with the ID “qaplaStatus” of type Text and mark it as required.
- Create a field named “qaplaStatusID” with the ID “qaplaStatusID” of type Text.
- Create a field named “reference” with the ID “reference” of type Text and mark it as required.
- Create a field named “trackingNumber” with the ID “trackingNumber” of type Text and mark it as required.
- Create a field named “trackingUrl” with the ID “trackingUrl” of type Text and mark it as required.

18. Click on Save to keep the changes.
5. Connect the Connectif Event to Qapla’ to Synchronize Information
19. On the reception event page just created, please copy the Endpoint URL.

20. Go back to Qapla’ and, go to Marketing > Connectif channel > Recommendations and click on Connectif.
21. On this screen, please make sure the purchase tracking function to be enabled and paste, in the field Webhook URL, the URL just copied from Connectif, as shown in the image.

22. Click on Update.
5.1. Creation and connection of Qapla’ query API
If you are going to send emails of order-status change through Connectif, this step would not be necessary, although recommended.
23. In your Connectif account, please go to Store Settings in the left side menu.
24. In the tab selector, go to “API and Access IPs > API Keys” and click on Create new API key.

25. On Permissions, please check the Read option in the Contacts area.

26. Click on Save.
27. Copy the Key ID created for your API key.

28. Please go back to Qapla’ and, go to “Marketing > Connectif channel > Recommendations,” and click on Connectif.
29. On this screen, paste the key just copied into the API Key field.
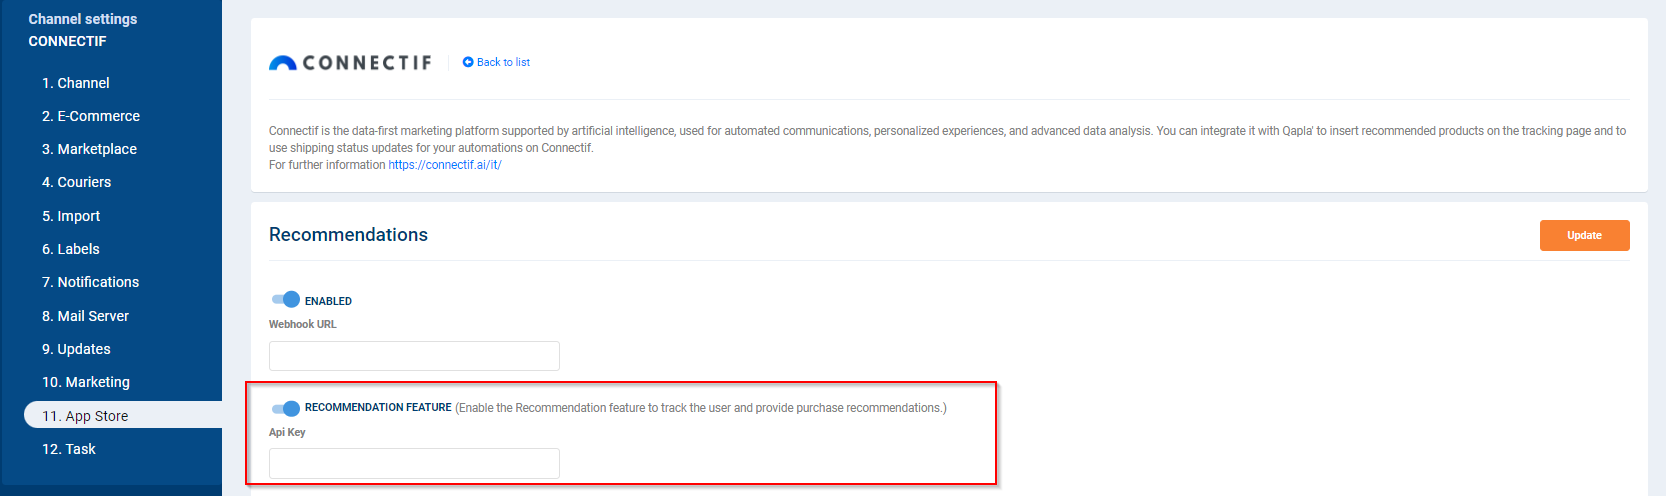
30. Click on Update.
6. Connect Connectif with all other active channels in Qapla’
To end the connection, you will have to replicate the following steps on the other active channels in Qapla’ as well:
- Enter the Connectif snippet in the tracking-page of Qapla’ (as in point 2)
- Link the Connectif Event to Qapla’ (as in point 5)
How the order-status change will look like on Connectif
Once this integration is done, when the order-status of a Contact changes, this will be reflected in the Activity of its own Contact Sheet.

The status which an order passes through are reflected in the elqaplaStatus field and in the qaplaStatusId field of the integration (step 4), corresponding to the codes and values in Qapla’:
| ID | Code | Italian name | Spanish name | Italian abbreviation | Spanish abbreviation |
|---|---|---|---|---|---|
| 0 | WAITING TO COMPUTE | Attesa Elaborazione | Esperando elaboración | Attesa Elab. | |
| 1 | PENDING | In sospeso | Pendiente | ||
| 2 | INFO RECEIVED | Attesa ritiro | Pendiente de retirar | Pendiente | |
| 3 | IN TRANSIT | In transito | En tránsito | ||
| 4 | OUT FOR DELIVERY | In consegna | En reparto | ||
| 5 | FAILED ATTEMPT | Tentativo di consegna fallito | Intento de entrega fallido | Consegna fallita | Entrega Fallida |
| 6 | EXCEPTION | Eccezione | Problema | Problemi | |
| 8 | DELAY | Ritardo | En Retraso | ||
| 10 | PICKUP POINT | Punto di Ritiro | Punto de retiro | ||
| 20 | DEPARTED | Partito | Enviado | ||
| 50 | PROCESSING | In lavorazione | En elaboración | ||
| 95 | RETURNED | Rientrato | Restituido | ||
| 99 | DELIVERED | Consegnato | Entregado |